Enhance Curb Appeal: Expert Tips for Landscape Outdoor Lighting Design
You’ve pruned the hedges, planted colorful blooms, and kept the lawn perfectly manicured. Your home looks its absolute best… until the sun goes down. Then, it vanishes into the shadows, its charm hidden by the night. This is where the magic of landscape lighting design steps in. Think of it as the final, transformative coat of paint or the perfect piece of statement jewelry for your home’s exterior. More than just a security measure, a well-designed lighting scheme is a powerful tool to elevate your curb appeal, creating a stunning first impression that lasts long after dusk. It welcomes guests, showcases your home’s architecture, and turns your property into a neighborhood landmark after dark. This guide will walk you through expert strategies to move beyond simply installing lights to strategically designing with light, ensuring your home looks just as beautiful at night as it does during the day.
Creating a Welcoming Entrance: The Art of the Arrival
The path from the street to your front door is a story, and lighting sets the tone for every chapter. A welcoming entrance isn't just about brightness; it's about guidance, warmth, and a clear sense of arrival.
Lighting the Journey: Driveways and Walkways
Your driveway and primary walkway are the red carpet to your home. The goal here is safety blended seamlessly with style. Glaring, pole-mounted lights create harsh shadows and a commercial feel. Instead, opt for a softer, more inviting approach.
- Driveways: Consider low-level bollard lights or small, staggered outdoor walkway lighting fixtures along one side. This defines the edge without overwhelming the space. For a wider driveway, soft wash lighting from fixtures placed in adjacent planting beds can elegantly illuminate the surface.
- Walkways: This is where rhythm and subtlety reign. Path lights should be placed to highlight the walkway's shape and guide the eye—and the feet—smoothly toward the entrance. Space them 8-10 feet apart, staggering them slightly rather than creating a rigid, military line. The light should pool gently on the path, not blast outward into the garden. This thoughtful approach to outdoor walkway lighting ensures safe passage while creating a beautifully lit frame for the journey to your door.
The Grand Finale: The Entryway
Your front door is the climax of the arrival sequence. It should feel important, safe, and inviting.
- Flanking Lights: Symmetrical wall sconces or lanterns on either side of the door are a classic, timeless choice. They provide excellent task lighting for finding keys and create a balanced, dignified focal point.
- Overhead Light: A ceiling-mounted fixture or a lantern above the door adds another layer of welcome and ensures the immediate area is well-lit.
- The Final Step: Don't forget the stairs leading to your door. Integrated led stair lights, recessed into the risers, provide the ultimate in safety and a sleek, modern look. They eliminate dangerous shadows on each step without creating any glare for those ascending or descending, ensuring the final approach is as secure as it is stylish.
The principle for the entrance zone is clarity and warmth. Every light should have a purpose, guiding visitors effortlessly and making them feel expected and welcomed.
Focusing on Architectural Features: Showing Off Your Home's Best Angles
Your home has unique character—a stone facade, graceful columns, interesting gables, or a beautiful porch. Nighttime is the perfect opportunity to turn these features into dramatic sculptures. This is where you move from lighting an area to lighting an object.
The Techniques: Grazing and Washing
- Grazing: This is the most dramatic technique for textured surfaces like brick, stone, or shiplap. Place a fixture outdoor well lights are perfect for this) very close to the wall, aiming the beam upward to skim the surface. This exaggerates every bump and groove, creating incredible depth, shadow, and a tactile quality you can almost feel.
- Washing: For a smoother wall or to highlight a broad architectural plane (like the space between two windows), use a fixture set farther back to "wash" the surface with an even, wide spread of light. This provides a clean, glowing backdrop.
What to Highlight:
- Columns and Pillars: Uplight them from the base to emphasize their height and grandeur.
- Architectural Details: Use a narrow-beam spotlight to pick out unique features like a peaked gable, an arched window, or decorative trim.
- The Overall Facade: A combination of grazing and washing can make your home appear to glow from within, emphasizing its form and color against the night sky.
The key is subtlety and focus. You are not trying to turn night into day, but to selectively reveal. Often, lighting two or three key architectural elements is more powerful than illuminating the entire house flatly.
Layering Light for Depth and Drama: Painting with Shadows
Flat, uniform light is the enemy of curb appeal. It flattens dimensions and kills mystery. The secret of professional-looking design is layering—the strategic combination of different lighting types and directions to create a three-dimensional, captivating scene.
The Four Key Layers:
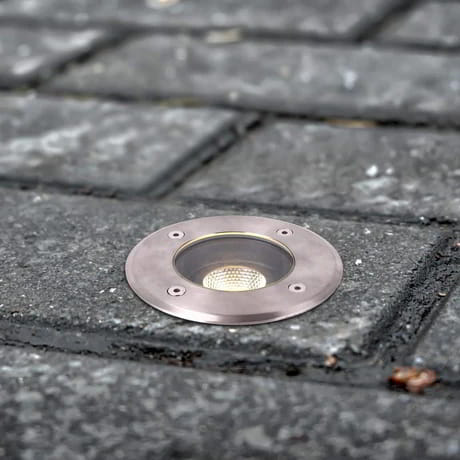
- Uplighting: This is light directed upward, typically from Well lighting fixtures installed in the ground. It’s used to highlight trees, architectural columns, and walls, creating drama and vertical interest.
- Downlighting: This is light directed downward, often from fixtures mounted high in trees or under eaves. It mimics moonlight, creating soft, dappled pools of ambient light on the ground below. It’s excellent for lighting patios, seating areas, and pathways in a natural, gentle way.
- Path & Task Lighting: As discussed, this is your functional layer for safe navigation (outdoor walkway lighting, led stair lights).
- Accent Lighting: This is specialized, focused light for specific small features—a spotlight on a flag, a tiny light in a fountain.
Creating Balance:
The art is in the balance. A front yard with only bright uplights on every tree will look like a stadium. One with only downlights may feel gloomy. A good rule is to use downlighting as your primary ambient light source (it feels most natural) and uplighting for strategic accents. For example, use a gentle downlight in a large oak tree to cast light on the seating area below (ambient), and then use a single, powerful led spot lights 12v to uplight the tree’s magnificent trunk (accent). This combination creates layers of light at different heights and intensities, resulting in a scene with richness and depth that invites the eye to explore.
Highlighting Landscaping and Garden Features: Bringing the Garden to Life at Night
Your landscaping is a crucial part of your home’s curb appeal. The right lighting can make mature trees, sculptural shrubs, and garden art perform a second act after dark.
Lighting Trees and Shrubs:
- Mature Trees: For a tree with a beautiful branching structure, place a single, shielded outdoor well light (a type of Well lighting) close to the trunk, aiming up into the canopy. This reveals the intricate skeleton against the sky. For a tree with a dense, rounded canopy, placing a light farther back and aiming it at the foliage can create a beautiful, glowing orb of light.
- Ornamental Shrubs and Plants: Use smaller, lower-wattage well lights or spike-mounted spotlights to graze across textured plants like ornamental grasses or to backlight large-leafed plants like hostas, creating a glowing edge effect.
Creating Focal Points:
Every well-designed landscape has focal points—a specimen tree, a fountain, a piece of art. Lighting makes these elements the stars of the nighttime show.
- Statues and Sculptures: Use two lights from different angles to avoid flatness and create modeling. A 45-degree angle is often most flattering.
- Water Features: Underwater lighting for ponds or submersible lights in fountains add a mesmerizing, magical element. The moving, reflected light adds a dynamic quality that static lighting cannot match.
The Golden Rule of Garden Lighting: Always light from the front and slightly to the side. Lighting from directly behind an object creates a silhouette (which can be a desired effect for certain plants). Lighting from directly in front flattens it. The side angle reveals form and texture. And always, conceal the light source. The viewer should enjoy the effect—the beautifully lit tree—not see the bright bulb glaring at them from the bushes.
Practical Considerations: Installation and Stewardship of Light
A beautiful design must be built to last and maintained with care.
The 12V Advantage: For the layered, subtle, and safe system described, a 12-volt low-voltage system is essential. It allows for the use of discreet fixtures like led spot lights 12v and outdoor well lights, is safe for DIY installation, and is highly energy-efficient when paired with LEDs. The transformer, placed in a discreet but accessible location, is the command center for your entire display.
Installation Tips for a Flawless Finish:
- Test at Night: Always place your fixtures and test their effect with temporary extension cords at night before digging any trenches or making final commitments. Your eye at dusk is the best judge.
- Hide the Wires: Use dedicated landscape-grade cable and bury it 6-8 inches deep. Use conduit where the wire rises vertically into a fixture.
- Protect Connections: Use only waterproof wire connectors (gel-filled or heat-shrink) at every splice. Corrosion is the number one cause of lighting system failure.
Maintenance for Lasting Beauty:
- The Annual Tune-Up: Once a year, check all fixtures for overgrown vegetation, clean lenses with a soft cloth, and inspect wire connections at the transformer for corrosion.
- Trim and Adjust: As plants grow, they will block and change your lighting effects. Part of garden maintenance is maintaining the sightlines of your light beams.
- Lens Care: Periodically wipe dirt, pollen, and spider webs from fixture lenses. A dirty lens can reduce light output by over 50%.
Conclusion: Your Home, Illuminated
Enhancing your home’s curb appeal with lighting is not about wattage or quantity; it’s about strategy and artistry. It’s the thoughtful process of using light to write a visual story about your home—one of welcome, character, and beauty. By mastering the layers of light, focusing on architectural and landscape highlights, and ensuring every fixture serves a deliberate purpose, you move from having outdoor lights to possessing a true lighting design.
Start by standing outside your home at dusk. Imagine the story you want to tell. Where should the eye travel? What features deserve a spotlight? Begin with one element—the entryway, a beautiful tree—and build your layers from there. The transformation will be profound. Your home will no longer disappear at nightfall. Instead, it will step into the spotlight, offering a warm, dramatic, and unforgettable impression that truly enhances its curb appeal, night after beautiful night.
News Photos
The latest news on shopping malls - product promotions, celebrity visits, product launches, events for kids, band performances, DJ Nights, Festival Celebrations, Social Causes and more.
 |
Social Network
|
|
|
|
|
|
Partner Sites
![]()