CapCut Pro Tricks: Combining AI Voiceovers with Advanced Transitions
To content creators who desire to make their workflow efficient but do not want to compromise the quality, CapCut Desktop Video Editor comes as a revelation. CapCut also uses its professional features, such as AI voiceovers, seamless transitions, brightening, and other enhancement effects, assisting in transforming regular clips into interesting videos. It can boost your video to the next level, whether it's your YouTube tutorial, business explanations, or a classroom presentation.
AI Voice Generator is one of the best tools in CapCut. It enables you to turn text into realistic-sounding voiceovers, which are ideal in narration, walkthroughs, etc. This, coupled with the seamless change of scenes, can turn your video into something informative and very immersive.
Why Use AI Voiceovers in Editing?
Voiceovers play an important role in narrative and narration. However, a voice actor may be time-consuming and expensive to hire, or recording yourself may be time-consuming and expensive. This is addressed by CapCut in its Text-to-Speech option. You just walk through your script and select a voice, and you come up with an instant narration without leaving the editor.
An included AI voice generator means that you have several patterns at your disposal, including different languages, tones, and genders, to ensure that your content resembles your brand or message.
Step-by-Step: Combine Voiceovers with Transitions in CapCut
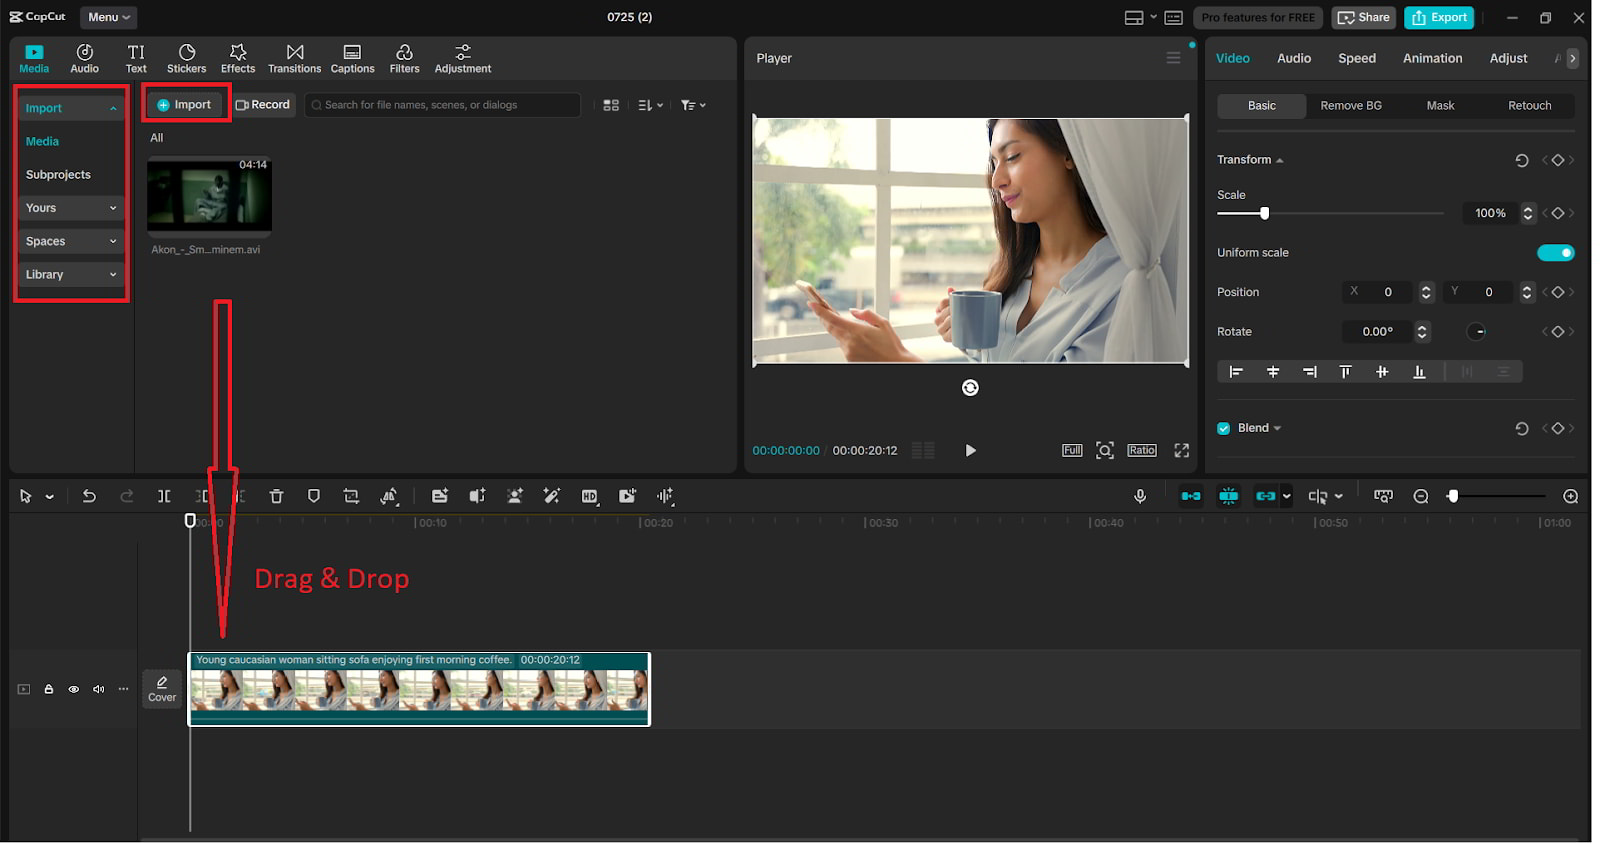
Step 1: Start a New Project and Import Media
Launch Open CapCut Desktop and press the "New project" button on the interface, then press "Import" to add your clips. Drag the files into the timeline and have the files in the required sequence.
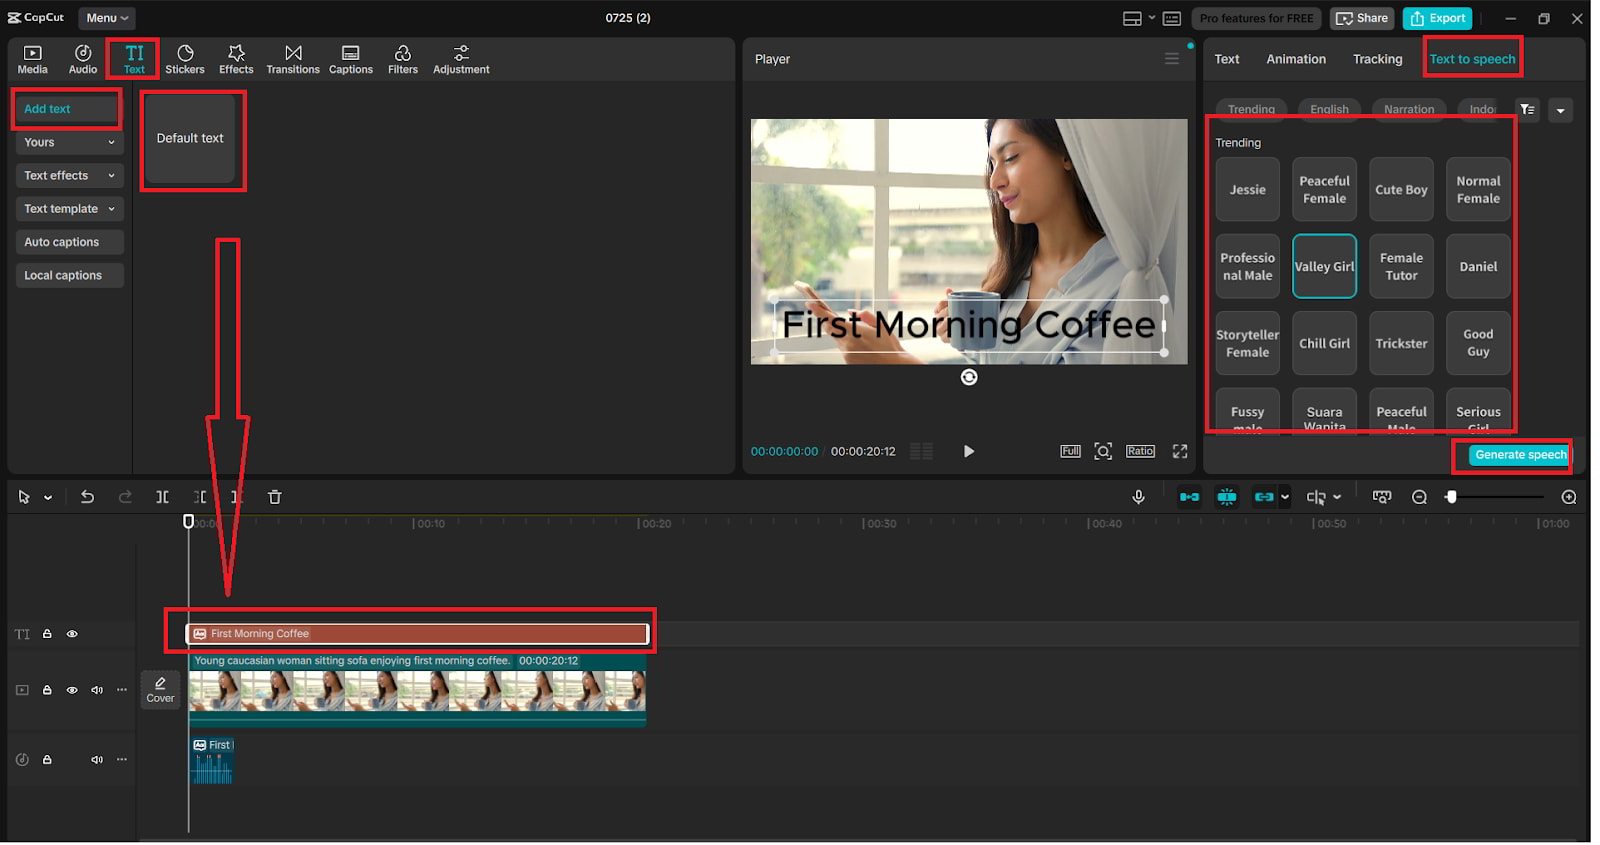
Step 2: Add AI Voiceover with Text-to-Speech
On the top menu, go to the tab "Text" tab and select "Text to speech". Write your script, choose your voice, and press the “Generate speech”. The sound will be in the timeline on the "Audio" track. This text to speech AI program has natural tones that are great for narration, such as a story, a tutorial, or other purposes.
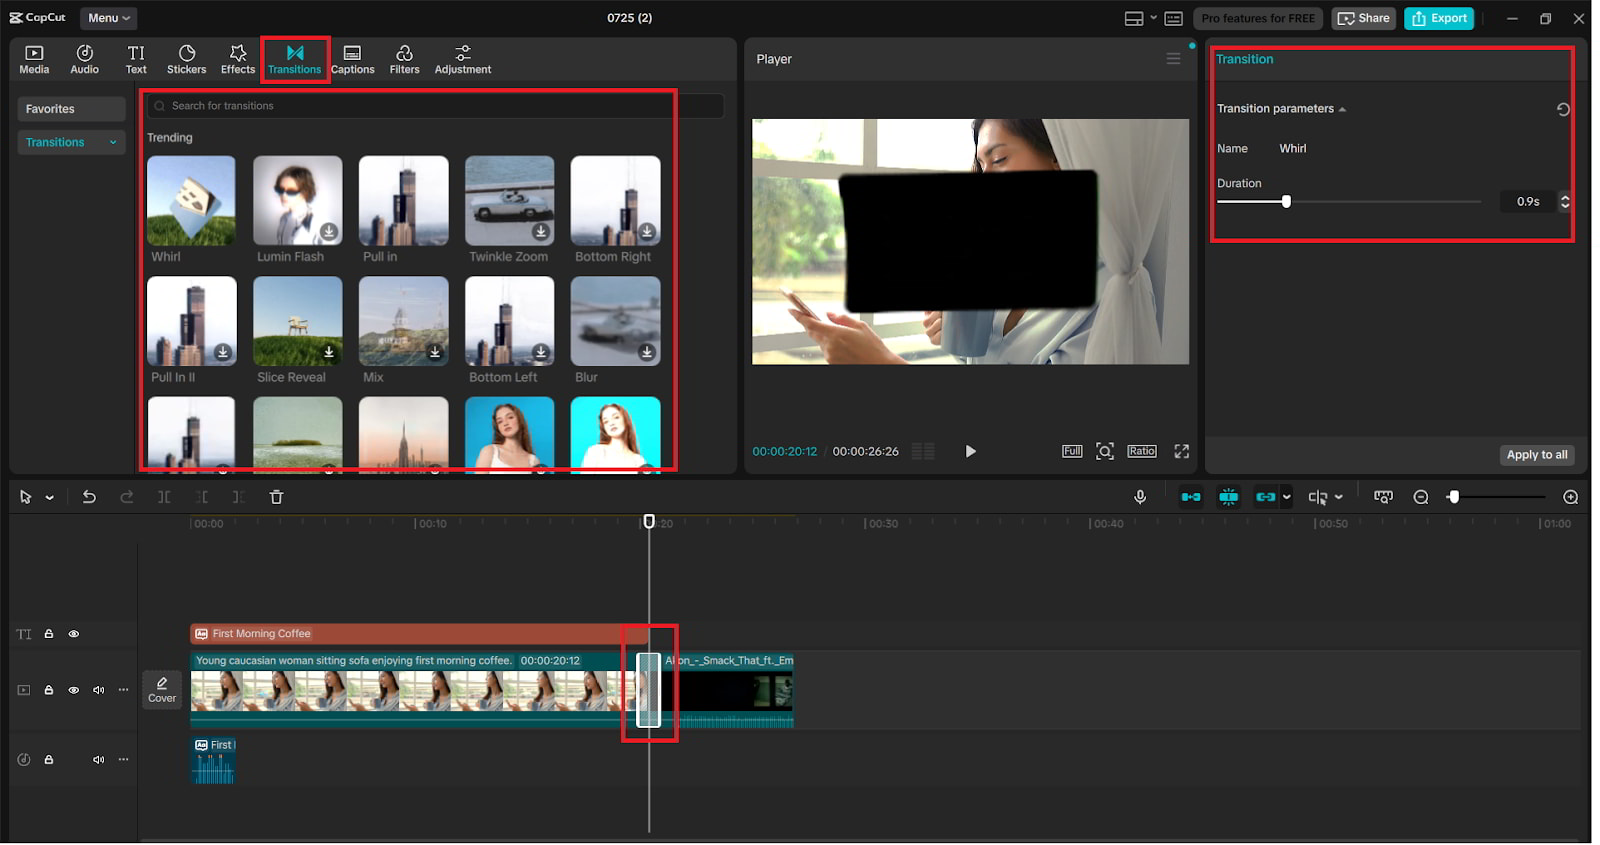
Step 3: Apply Seamless Transitions
To access the "Transitions" menu, click the icon between two clips, which can be identified as +. Select an effect such as "Glitch", "Zoom", "Fade", or "Slide" and apply it by clicking it. Drag the sides of the transition to change its length and to achieve pacing between scenes.
Step 4: Sync Audio and Add Enhancements
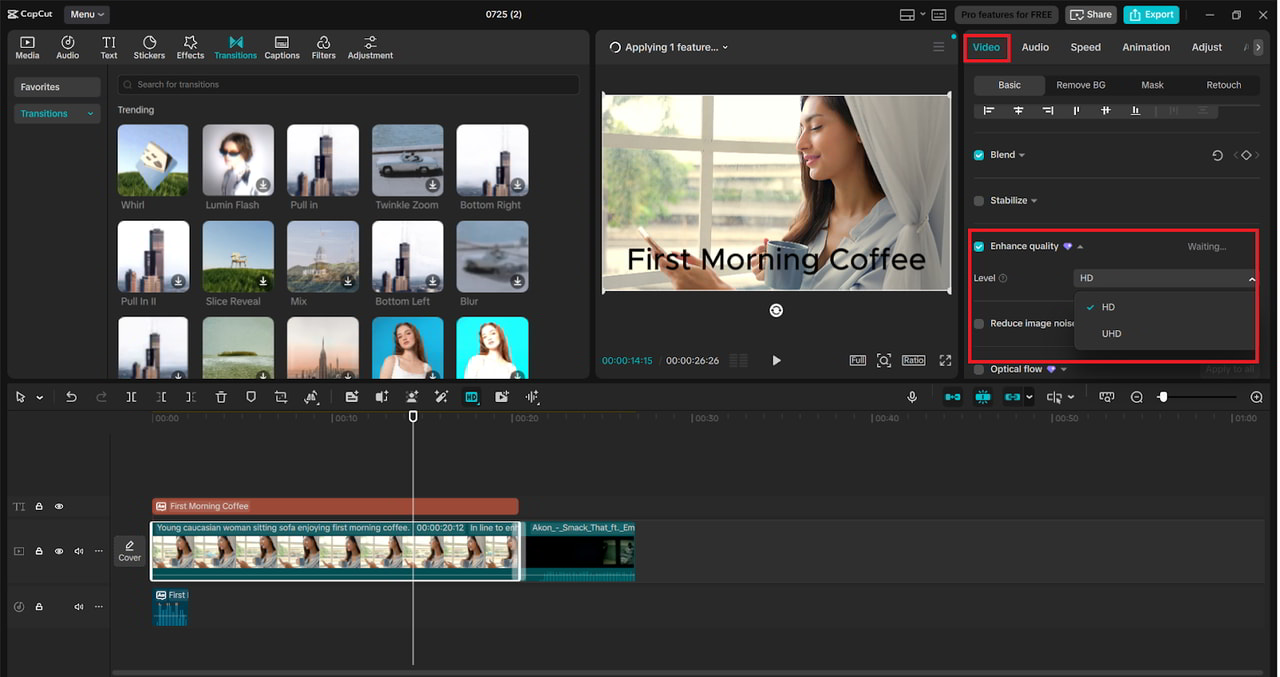
Zoom in on the timeline to synchronize your voice-over so it matches certain visual images. It is possible to adjust the levels of the audio by choosing the clip and utilizing the control called "Volume" control in the upper toolbar. In case of poor-quality footage, capture a clip and proceed to the right-side editing panel to the section labeled as "Enhance quality". It is in this place that you will apply the capability of CapCut's AI Video Upscaler, which will enhance sharpness, brightness, and decrease noise in a way that is brilliant and intelligent, and automatic.
Step 5: Export Your Final Video
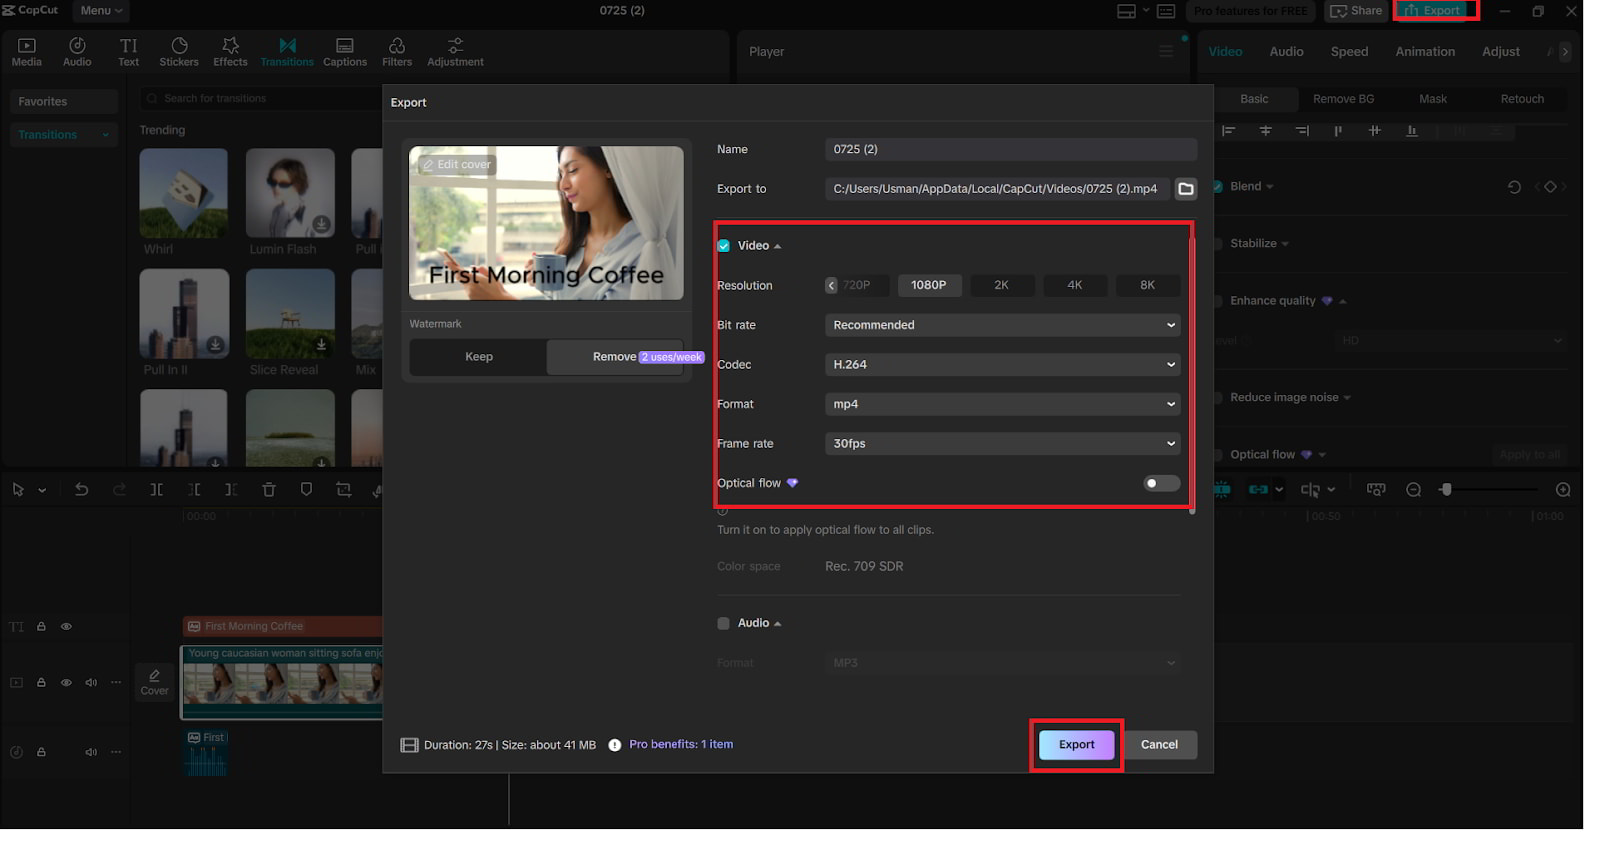
When you have edited your video, go to the upper right corner and click "Export". Select the preferred resolution, format, and quality. Here you will be able to add an appropriate name to your project, and you can choose the output folder as well as change the bitrate to gain a better compression. To create your video, hit the "Export" button once more after setting things up. Your sparkling content can now be deployed on multimedia platforms.
Tips for More Dynamic Video Storytelling
-
Use Captions with Voiceovers: CapCut lets you generate subtitles from voice clips. After adding your voiceover, right-click and choose “Auto captions” to boost accessibility and viewer retention.
-
Match Transitions with Tone: Not every video needs flashy transitions. For tutorials, subtle fades or zooms work better. For energetic content, go for glitch or whip pan effects.
-
Add B-Roll and Cutaways: Keep your audience engaged by adding B-roll clips or images. Use picture-in-picture layering to highlight key points without disrupting narration.
Why CapCut’s AI Features Stand Out
The integration of AI in a clever way is what is special about CapCut. The Text to Speech app applies natural-sounding voices and expression tones. The AI Video Upscaler optimizes the images without spending long hours doing it manually. These are designed for clients who seek creators who will give results fast and professionally.
Final Thoughts
CapCut Desktop can help a creator work smarter by using simple and powerful tools. With the AI voice generator used to narrate your content, text to speech AI to make the delivery sound natural, and the AI video upscaler to render the visuals tidy, not only will your content sound great, but it will also be a blast to look at.
They are essential to you in case you are intent on coming up with something that can get people to pay attention to. Experiment with them on your next project, and you will be impressed with the difference.
News Photos
The latest news on shopping malls - product promotions, celebrity visits, product launches, events for kids, band performances, DJ Nights, Festival Celebrations, Social Causes and more.
     |
Social Network
|
|
|
|
|
|
Partner Sites
![]()